
Convert-a-Bra
How to make an ordinary bra into a pocketed mastectomy bra!
Umm...WHAT????
You're kidding, right? Nope! You can avoid having to do without extra bras because you can't afford very many of those expensive mastectomy bras. You may not happen to HAVE medical insurance that will buy any bras, or your insurance may only pay for one or two bras. (Check into that if you haven't already, I think Medicare and Medicaid will usually pay for up to 6 mastectomy bras per year and a pair or two of foam leisure forms, and many other insurance companies do, also.)Before getting into the bra conversion, let's make a point clear. I'm not saying that making a regular bra into a mastectomy bra is always the right thing to do at first. Going somewhere to be properly fitted for a good mastectomy bra will show you the wide variety of bras and forms currently available and get you a really good quality, well fitting, and properly sized bra, so at least you'll know what it SHOULD feel like. Having a good fitter on your side can give you the best chance of being comfortable. They are professionals and can guide you to what may help you feel the best with your personal surgical results. I have seen so many people over the years who (after surgery) found that they'd been wearing the wrong size bra most of their lives.
My wonderful local fitter has always been willing to work with me to help me find the best choices. I have full confidence in her. If you look around, you'll find a similar shop with someone like her. But look further if you're not as happy with your fitters and they don't take time to fit you properly.
You only have one body and you deserve to be as comfortable as possible. Just...please...be aware that mastectomy fitters cannot give you back your original breasts, they are not miracle workers. They can, however, give you the best reasonable facsimile. Be patient, and go in knowing that there are a few things you may have to adapt to and some discomforts that simply cannot be fixed...yet...though there are often things you can do to make your bras work better for you, as shown in the patterns on this website.
Not all style bras work for every body. It's important to find one that's comfortable, without undue pressure on your scars. (Personally, I've found one called the 'Almost U Wide Band Mastectomy Bra' to be among the most comfortable for me, but (since I have a big tummy) even it rides up eventually when wearing silicone breast forms. See the page on the "Bra Band Ouch Fix" for a solution if that happens to you.)
That all said, in the beginning, it's difficult on anyone who once had a drawer full of bras. Suddenly, you find you are having to live with one or two special pocketed mastectomy bras until you can afford more. Mastectomy bras generally cost $35 and UP, many around $75, but you can buy really good full-coverage bras for around $18, and, with a needle and thread or a sewing machine, install a pocket for your breast form in no time flat. :^)
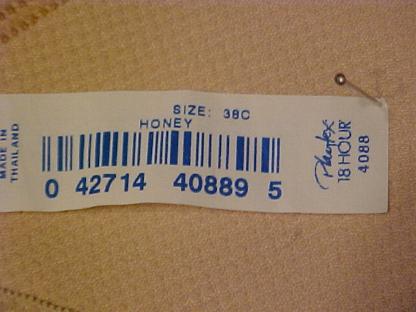
As a little extra tip: When you're shopping for a bra to convert, try first searching among the full coverage Playtex ones with the wide shoulder straps. There's one, the Playtex 18 Hour Airform Comfort Lace #4088, that even already has a 'sort of' pocket in it that may work for some breast forms without having to sew another pocket in. (That's the one I'm using in the instructions at the right, but here we're adding a REAL pocket to it.) Now, over the years, it's likely not available anymore, but it'll give you the general idea.
Always look in unexpected places, you never know when you may find something usable. I don't advise 'sports bras' though, they are made to compress breasts, which is something you absolutely DO NOT want to happen with breast forms. (It presses them HARD into your scars, ouch! It's quite possible that they can contribute to lymphedema, while pressing breast forms too firmly into already scarred tissue where lymphatic fluid needs to pass.) I do, however, like the super thin spandex bras you can sometimes find that are so light that they are barely there. If they have slits with modesty pads inside them, just slip in microbead breast forms or foam breast forms instead and they are REALLY comfy.
Here's what you'll need before you get started:
- ironing board or sofa pillow, anything you have that can be pinned into.
- Sewing pins
- Sheet of plain typing paper
- Fabric that stretches a lot in both length and width. (Swimsuit fabric works best, look for skin color preferably, or bra color, and don't mistakenly buy 'swimsuit lining', make sure it's the real swimsuit outerwear fabric!)
- Pencil or pen
- Scissors, cheap ones for paper and your good pair for fabric.
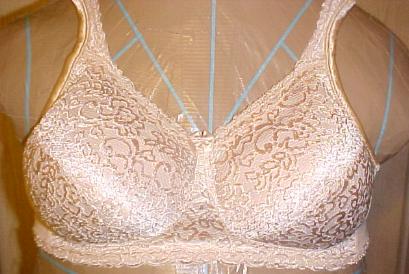
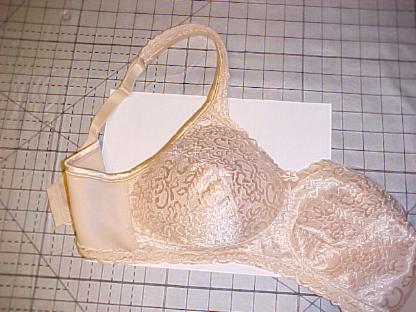
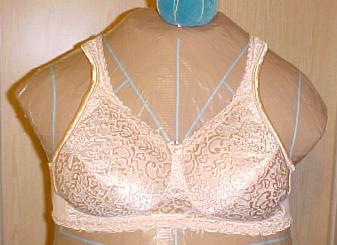
As I said earlier, a full coverage bra similar to this one below (the Playtex 4088) can easily be converted to a pocketed mastectomy bra. There's probably quite a few full coverage ones available that will work, if you look around.
You want to make sure the neckline will fit close to your body, covering any 'sunken in' areas. The underarm should come up high enough to fit close above your side scars, but not so tightly that it can compress you too much. The cup size needs to be large enough for whatever breast form you choose to use, and the style of the bra cup should look filled to the end with the breast form you wear.
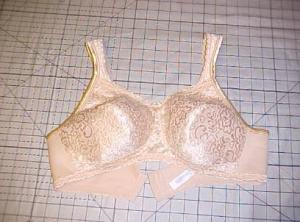
For example, the bra in this example happens to be a size 38C. A foam breast form, a silicone form, and a microbead breast form, all fill it fairly well, but the smoother rounded-front foam form might not fill it firmly right to the apex (the largest part of the bustline), especially if your foam breast form is older and becoming compressed, as foam does over time. Silicone or microbead forms keep it firmly protruding to the apex, the same as a breast would.
It all depends on your particular form and what style and size it is. Remember how BEFORE mastectomy, you had to try on several bras to find one that looked and fit correctly? That part has not changed, you still need to try on several to find what you need. I'm just showing this one because it's one of several that happened to work for me, and it's a good starting point to help you begin your search.
Here's a close-up below of the label in it. You can copy it and print it out to take with you to show a salesperson, if you want to find this bra or one similar to it. It may be that you own a few full coverage bras already, that you'd used before surgery. If so, try one of those first.
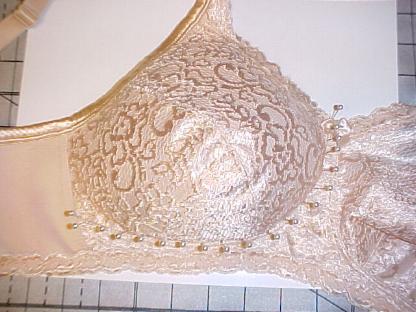
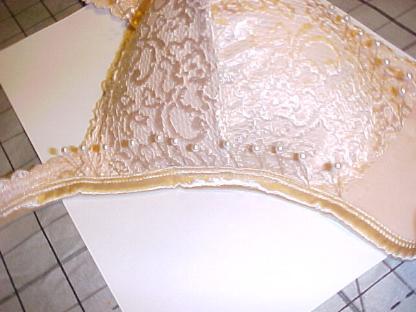
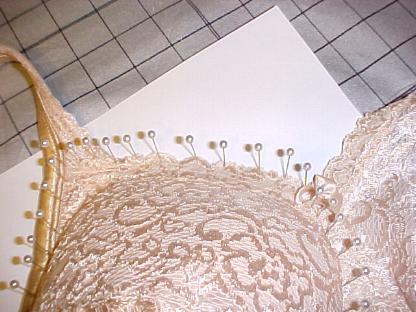
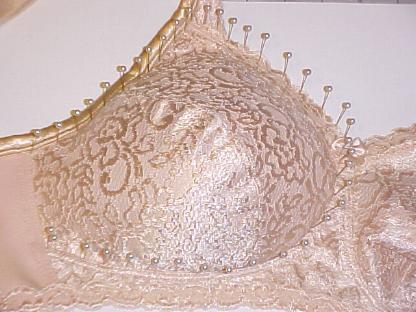
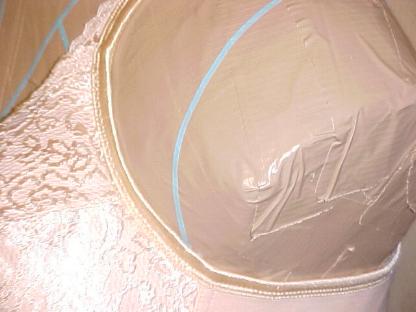
In this particular bra style, there's a lining in it with an opening that looks somewhat like a mastectomy pocket. It might work with some breast forms, or it might hold enhancers or fillers in place (if you've had a lumpectomy). This will only work 'in a pinch', because the pocket would be wrinkled up next to your skin and the breast form would be partially visible through the thinner lace cup of the bra front. Here's a photo of the opening already in this bra. It's really a bit thick as a mastectomy pocket, but helps keep the bra cup shaped nicely if you add your own real pocket.
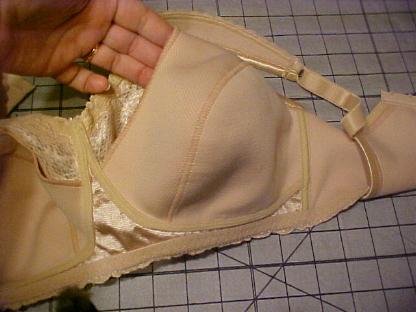
Another tip about that photo above. Real mastectomy bras always have pockets that, like this bra, are fitted the same as the rounded shape of the bra cup. That always leaves some wrinkles of fabric scrunched up against your chest, behind your breast form.
While this must to be done in commercial mastectomy bras so that they can accommodate someone with a single mastectomy on either side, still leaving a rounded 'cup' to hold the real breast, YOU don't have to shape your customized pocket in that way. If you've had bilateral mastectomy, neither of your bra pockets has any reason to have all that bulky extra fabric for your breast form to wallow around in. If you have a single mastectomy, you only need a pocket in that one side.
All that extra fabric sometimes allows forms to actually move upwards into the neckline. A custom sized pocket will hold your breast form inside the cup significantly better.
Of course, your bra cups won't fold into each other when stored or packed,if you make these flat-backed pockets. However, they will be much more comfortable when you wear them if they have a flat smooth back to the pocket. Comfort on your body is more important than they way bras fit in a drawer. :^) That's what we're going to make here, a flat, perfectly fitted pocket.
It's VERY simple to do. Let's make a custom fitted pattern for your specific bra first:
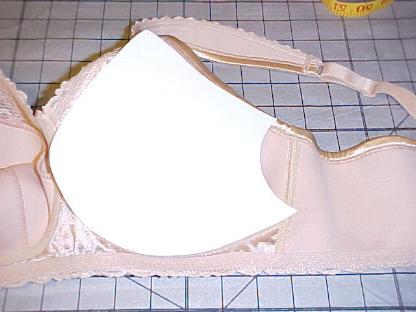
Lay a sheet of paper down on your ironing board or other pin-able surface. Next, lay your foam leisure breast form down on the paper. (If you don't have a foam one you can pin around, just stuff the cup with fiberfill until it looks full. Do not use your silicone form or any form that can be damaged by pins!)
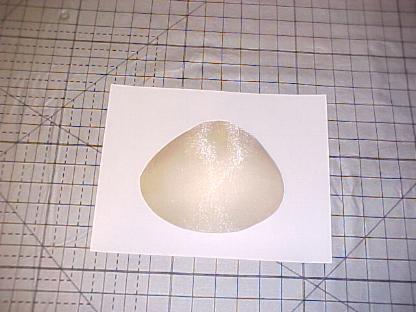
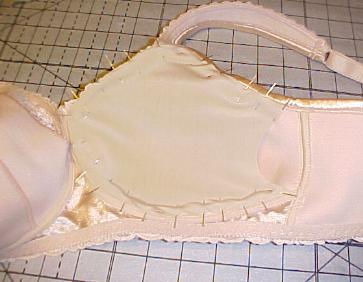
Lay your your bra over the foam breast form, shaping it with your hands so that it lays as flat as possible on the sheet of paper, all around the cup of the bra.
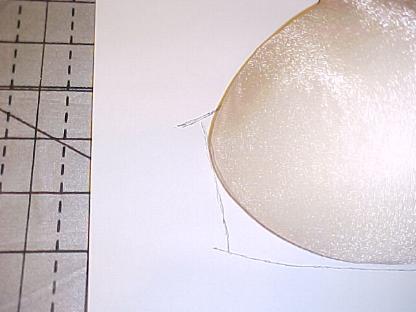
Carefully pin around the bottom seam of the bra cup, following it all the way up to the upper center front.
Now pin from the strap to the underarm area of the bra cup.
Now pin around the neckline area. In this case, there's lace there, so pin near the outer edge of the lace.
It should all be pinned now except for the seam of the underarm, and should look like this below. See how it's not pinned over to the left?
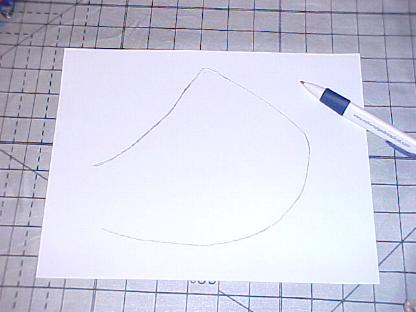
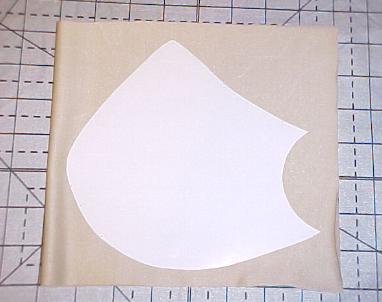
Unpin it, remove the bra, and look at the dots where the pins were. Using a pen or pencil, just connect the dots to make your pattern!
You'll notice that the underarm seam isn't marked yet, that comes next. Lay your foam breast form over the pattern, in about the same area it was inside the bra earlier. If you stuffed your bra cup with something else because you don't have a foam breast form, you can now lay a silicone form there, because you can see it clearly and NOT pin into it.
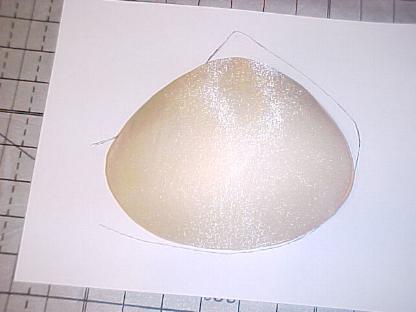
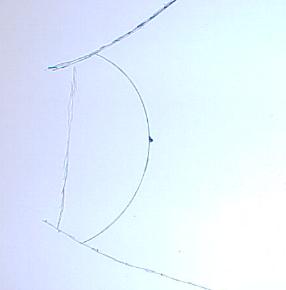
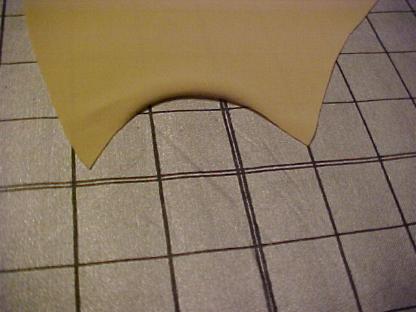
You're now going to draw a straight line for reference, from the underarm to the bottom seam line, so that it would barely touch the form a little in the middle area.
Remove the form. Make a dot about in the middle of the line area, but inwards toward the center about 1 1/4" .

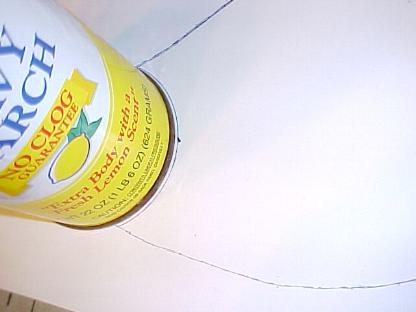
Put something rounded on the curved lines, about 3/8ths inch inwards from that straight line. (This will be more clear to you in the second photo below.) You'll need to find a can of something as a pattern for a semi-circle, I used a spray starch can here below, but a big hairspray can would work fine, or anything similar. You want the can to be placed so that it's bottom edge crosses both the 3/8" marks and the middle dot, and trace a semi-circle around it.
Below is what it'll look like now.
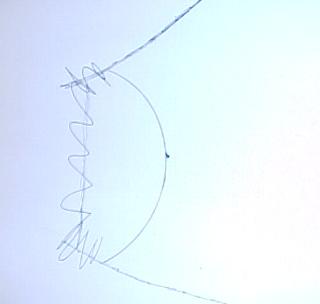
Make some squiggles over the lines you don't need now, to remind you to not cut them out.
Cut out your paper pattern, using your solid lines, and it'll look like this below. I've flipped it over here, but you can use either side to match either cup to see approximately where you're going to put your fabric pocket later. The reason that outer corner has to be rounded inwards, is that you will need a rounded hole with a circumference of about 9 inches (with the fabric fully stretched out) to easily get a breast form in and out of the pocket. This method will give you that, usually.
The pattern slipped down a little before I could get the photo taken below, but you can get the idea of where your pocket will go.
Cut a rectangle (more or less about 8 X 16 inches) of your 'swimsuit' stretch fabric. It needs to be large enough that it can be folded in half and still have room for your pattern to fit on it. By doing it this way, you will be cutting out two reversed layers.
Cut out around your pattern, through both layers. When you finish cutting and lay out your two pieces of fabric, it'll look like this below.
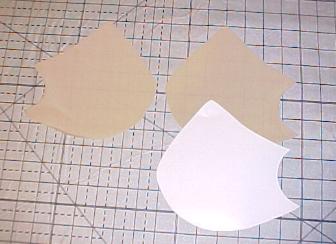
Next, I'll describe how to find out which piece goes into which cup. Grasp the corners of the semi-circle you cut at the underarm, pull gently but firmly, then release, until the fabric begins to get a definite 'curl' toward one side. The inward curl goes toward the bra cup, so that it's rolled and smooth on the side toward your body. You don't have to hem this inward curl, the swimsuit fabric will not ravel or run. See the curl below. This side would go toward your body and be visible when your pocket is finished.
We're now going to sew one pocket to completion, before starting the other pocket. Take one pocket and lay it over it's matching bra cup, similar to the way you lay the paper pattern over it earlier, and with the curl facing the bra. Start putting pins around the edges, pinning inwards toward the center of the pocket, so that you can more easily pull the pins out later with your right hand as you're sewing, just before the needle gets to them.
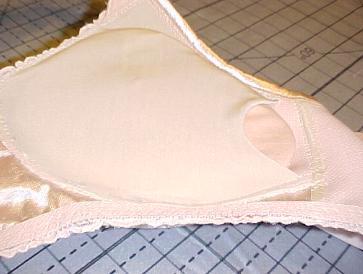
The pocket edges should just barely overlap the edges of the underarm seams and the under-breast seam, but go almost to the edge of the neckline. It should look something like this photo below. Be sure to leave open the semi-circle, you will not be sewing that....remember, that's your pocket opening.
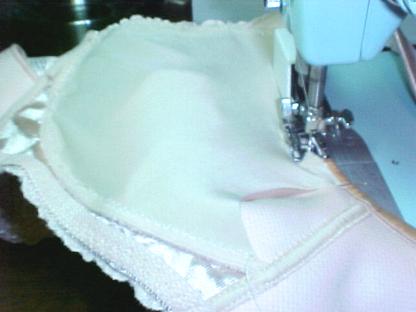
Set up your sewing machine with a stretch needle (or a universal needle if you don't have a stretch), use thread to match your bra (for example, beige for a flesh-tone bra, but anything close will do), set a medium-wide zig-zag stitch (about a '3' on my sewing machine) and a stitch length of about 8 stitches per inch.
Starting at the semi-circle, sew around the the outer edge of the pocket and bra cup, going slowly and removing pins as you go, raising and lowering your presser foot often to allow the fabric to lay flat and not get pulled up too close to the needle. It helps to use a tool to adjust the fabric when needed. (I use the 'Sixth Finger Stiletto', found online at TheSewBox.com . You may also be able to find one at your local sewing or quilting store) to help keep the fabric edge in place as it's going under the presser foot, because you don't want to get your fingers under the needle. That stiletto tool is invaluable to me in doing things like this, but I've also managed to use a chopstick, a very large needle, a small screwdriver, and an awl, when I couldn't locate mine, so use whatever you have.
Be very careful as you sew, peeking underneath often to make sure the bra cup won't be caught into your seam, keep it pushed away as you go. Sew all the way around, ending up back at the other side of the semi-circle pocket opening, as seen below.
Test fit at this point by putting your breast form in through the pocket opening to make sure the opening will stretch large enough. It should, for almost any size breast form, but if for some reason it doesn't (possibly because of your using a different bra style or much smaller size) just trim the semi-circle out a little bigger until it does fit, then trim your other pocket the same amount before pinning it in. Below you'll see this bra with a breast form already inside it.
Don't worry that your breast form's edge sticks out a little through the pocket, they often do that in most mastectomy bras. It give you a little more area to grab when pulling your breast form back out of it. Below is how it looks from the front.

You'll notice above that the zig-zag stitching is hardly visible at all, and I've found that to be true on most bras. Only YOU will know there's a mastectomy pocket inside it! I've left the little bow at center and stitched through it, as I'll do on the other side as well. You could remove the tiny bow, it's purely decorative, serves no purpose... I just liked it here, and like it even better sewn flat so it doesn't show through clothing. Normally, I'd have removed it on plain bras, but it went well with this lacy type bra.
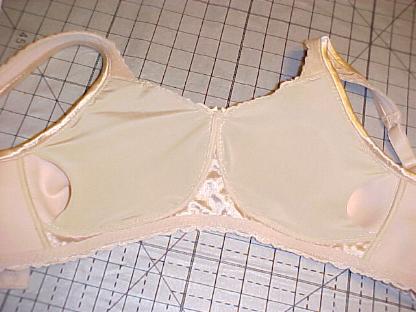
Pin the other pocket into the other side of the bra, and stitch around it just the same as this side. When you finish, the back of your bra will look like this below.
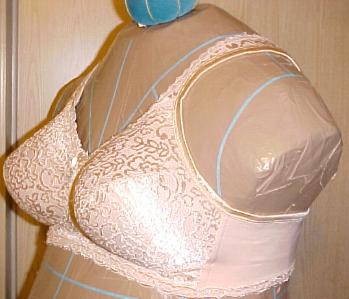
Below, I've put foam leisure breast forms inside both cups, and put the bra on my mannequin to test how it looks. As I've mentioned elsewhere on this website, I constructed a 'breast free' mannequin to use when I design mastectomy clothing, so that I can add the bra and breast forms currently being worn. It lets me step in front of my 'double' so that I can see any problem areas. (See 'Copy Yourself' to learn the basics on how to make one. If you like to sew clothing, it's well worth an afternoon's work to make one for yourself for future projects.)
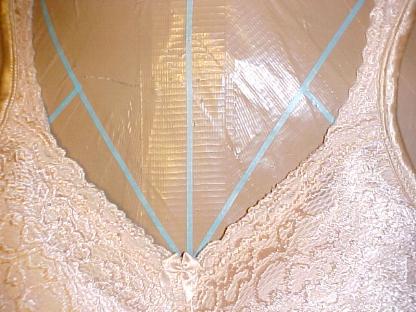
You'll notice in the next photo, in the close-up of the neckline, that this bra fits fairly close, up above the area with missing breast tissue. When choosing a regular bra to make into a mastectomy bra, you'll want to keep this area in mind to make sure you have full coverage and a close fit.
(If you're not getting a close fit, it sometimes is because you need one cup size larger for your size breast forms. With a large enough cup, the breast form is contained and the neckline gap often goes away.)
You'll notice below that, from the back, this bra is very close in design to an 'Almost U' brand mastectomy bra (my favorite), with a wide open area for low-back necklines, and it is wide, with 3 hook closures. Usually, you'll want a bra with at least 3 hooks and a wide underarm band. Narrower bands tend to be a painful problem because they may ride up under your armpits and into your scars.
Below, you'll notice that the underarms fit very smoothly and cover the scar depressions or 'holes' where lymph nodes may have been removed. This helps to keep your outer clothing from sinking into those holes and forming wrinkles to the arm-side of your bust-line. Because of that problem, high fitting armholes are an important thing to look for.
I noted that the bust cups of this style didn't fill completely as firmly as preferred when I put the foam leisure forms in it further above. When I put the bra on ME, they filled out fine, but this dress form is just a hard surface, not movable muscle and skin.
Below, the just-made pocketed bra has the microbead forms that I make for myself, and give instructions for you to make (HERE), using 2 1/2 cups of microbeads per form
in this pair. It fits much more fully, like silicone forms, changing shape to fit the bra cup.
A slightly
smaller microbead form using 2 1/4 cups per form, would also fit fairly
well in many other styles of C cup bras, and work extremely well in a B cup bra. When using foam breast forms, remember that even when brand new, they are a lot
more gently rounded (less pointed) at the front than silicone forms.
Some regular
bras may possibly not fill out as well with foam breast forms, especially if your foam forms are getting
old and compressed. These two photos below are done instead with microbead breast forms inside this same 'mastectomy adapted' Playtex bra. Notice how they fill firmly and conform right to the tip?
It all depends on what forms you wear most often, and what you feel looks best on you. You may want to have one bra for foam leisure forms, and one in a different cup size that you use for silicone forms on dressier days. Personally, I mostly almost always use microbead forms now because they are so lightweight and less painful for everyday wear, and microbeads conform better to a variety of different bra cup shapes than foam leisure forms, without shrinking... and make the bra look almost as good as silicone forms.
Don't feel you have to stick with one bra size after mastectomy. Some days you will just feel like changing around to fit what you're wearing, both in outer garment and in breast forms. When problems arise with fitting your bras to the new you, just think of it as another accessory to your wardrobe, sort of like "does this necklace or that one look better with this top?". :^)