
SEW YOUR OWN BREAST FORMS!
(Note:***After writing these instructions a long time ago, there were emails from people with the same pain issues as I've had with heavier silicone forms, but they either don't sew, don't currently have access to a working sewing machine, can't find the materials in their area, or are having a difficult enough time just making it through the workday while dealing with the pain. I make pairs of microbead breast forms in a dozen different sizes and offer them on the 'Items for Sale' tab of this website. Because of buying some of the items in bulk and constantly following sales, my price is often less than your cost to make one pair of microbead breast forms yourself even though I pay retail the same as you. I try to keep a pair priced less than half the price of only ONE commercially produced microbead form. I love to sew, have the time right now, and am happy to make them for you. I plan to keep doing it for as long as my health and vision allows. These are the sizes I make:
6XL fits Size 40GG, 42G, 44DDD, 46DD, 48D, 50C, 52B, 54A
5XL fits Size 38GG, 40G, 42DDD, 44DD, 46D, 48C, 50B, 52A
4XL fits Size 42DD, 44D, 46C, 48B, 50A
3XL fits Size 40DD, 42D, 44C, 46B, 48A
XXL fits Size 38DD, 40D, 42C, 44B, 46A
XL fits Size 36DD, 38D, 40C, 42B, 44A
L fits Size 34DD, 36D, 38C, 40B, 42A
M fits Size 32DD, 34D, 36C, 38B, 40A
S fits Size 32D, 34C, 36B, 38A
XS fits size 30D, 32C, 34B, 36A
XXS fits Size 30C, 32B, 34A, 36AA
XXXS fits Size 26D, 28C, 30B, 32A, 34AA
Click HERE to go to the page to buy a pair, or look below for exact directions on how to make them for yourself. (They're not really too hard to make if you do sew, so don't be afraid to try making a pair. Because of the comfort, you'll find they're well worth it to either make or buy, and they last pretty much forever (well, I haven't lived FOREVER yet maybe, but haven't been able to wear a pair out so far, and I've tried!). Please email and let me know if you make a pair, I LOVE TO HEAR FROM PEOPLE WHO SEW, because my non-sewing friends eyes glaze over when I I talk about sewing, lol... If you're like them, you can order a pair from me and I'll usually have them completed and on the way somewhere in between two days and two weeks (most often 2 or 3 days and I don't think I've ever actually taken over 10 days when I had a lot of orders in line). Gives me something to do when I can't sleep. Now, aren't you glad I have insomnia AND like to sew?)
If you'd like to keep up with notices on when new information is added on this website, or when I find something that anyone with mastectomy might be interested in, please follow my Facebook page (Mastectomy Solutions) and you'll see announcements from time to time, not often, don't worry. :^)
Now get ready, there's LOTS of photos along with the instructions below. Read through it, copy the pattern to your size, and have fun sewing!
************************* *************************
It can also give you a pain-free way to wear your forms all day long, because this pattern will give you a form that weighs only about ONE OUNCE, varying a fraction of an ounce more or less, depending on your size.
In my favorite 'purchased' silicone breast form brand, each form weighs over a pound. Now REALLY, girls, think about it. While it may be logical for those of us with a single mastectomy to have to 'match the other side' in size and weight, (and I'm not totally convinced on that any more) WHY do those of us who've had double mastectomies need to have heavy forms when we have nothing to match for balance? Hmmmmm? I'll just sit here while you think about it. 'AHA', right? :^)
There's no particular weight we MUST have on our chests or else we'll keel over backwards.
Some women choose to never wear ANY kind of breast forms after mastectomy, and probably part of the reason is the pain some forms have caused them. I have arthritis in my neck and can attest to the fact that my pain there isn't nearly as bad on the days I wear my own custom made lightweight forms, as it is on the days I wear the purchased silicone ones, or even the somewhat lighter weight purchased foam 'leisure forms' that I once wore most of the time.
The longer the lighter weight ones are used, the less the indentations show in my shoulders from holding up the 'double D boulders' all those years before surgery, or the silicone ones after. I can remember being at a staff meeting years ago (before breast cancer), not able to concentrate because the weight of my own breasts pulling down on bra straps was so uncomfortable on my neck and shoulders that day. I caught myself trying to cross my arms in front of me on the table to hide that I was actually resting my bustline on the desktop. That day, I was thinking seriously about breast reduction surgery.
(Having breast cancer and bilateral mastectomy was somewhat more reduction in size that I'd ever have WANTED, but it did turn out to have the side effect of giving me a way to reduce neck pain, so there's that.... hey, I am the 'glass half full' kinda girl, alrightie?)
*************************
- Microbeads (such as "Poly-Fil 100% polystyrene Micro Beads" sold at some Jo-Ann Fabric stores, some Walmart Stores, and maybe a few craft stores) These are NOT the heavy plastic beads you may have seen to stuff dolls with, these are light as air, incredibly tiny, and perfectly round. Depending on whether you find a sale, they cost anywhere from $17 to $32 per bag, so shop around.
- Fabric with 4 way stretch, such as swimsuit fabric, 1/3 yard will make several forms so will give you extra for 'trial and error' sizing (Don't accidentally get swimsuit lining, use actual outer swimsuit fabric. Beige is nice if you can find it, but any color will do.)
- Sew-in Interfacing, medium weight.
- Thermolam (or similar) Interfacing Fleece (it'll say something like 'heavily needled fleece' on it. It's not the kind of fleece you use in sweatshirts, it's sturdier. But, from now on in the instructions, I'll just call it fleece for short.)
That's it! Simple, huh?
Now for a little info about those products. First, 'Micro Beads', or what I prefer to call them...microbeads, one word. What you're going to look for is sometimes very difficult to find as a craft product, but easier if you look for a pre-made novelty pillow. Have you seen the squishy little neck pillows? The beads conform easily to any shape, so they make exceptionally good neck pillows (and breast forms!). If you only want to make one set of forms and don't want to buy a bag of microbeads, buy a small pillow. It will still be fairly pricey, but it's easier to find locally so you won't have to pay shipping.
Be careful, microbeads can make a big mess and could be dangerous for children or pets if spilled around the house. However, as a breast form handled by a careful adult, they should be safe enough. I've hand-washed my microbead forms, squeezed them into various tightly pocketed bras to test them, worn them extensively, and so far not a bead has escaped. (Don't want to admit it, because I don't want you to do it, but I have washed them in the washing machine set on gentle cycle, inside pocketed mastectomy bras, and no beads have ever got out.)
There are many ways to make a microbead breast form. After trying out various combinations of fabrics and wearing them in different bras and camisoles, I've found that using a 4-way stretch swimsuit fabric of about 20% Spandex in a skintone color works best. One side is a little more shiny than the other, so I prefer to make the forms with the shiny side on the inside and the matte one visible outside, so it's less noticeable through the lace of a bra, looks more like skin. The stuff is almost indestructible, so it'll really hold up to a lot of washing and wearing.
It's also a good idea to use a layer of sew-in interfacing just inside the back of the form to stabilize it and stop the fabric from stretching in the back, with a layer of fleece next to that to further help the back to hold it's shape. It's not the kind of fleece you use in sweatshirts, use Thermo-Lam fleece that's used for thin quilted projects. It helps the microbead breast forms retain their overall base shape and keeps the edge seams from rolling forward as the microbeads squish around, plus it's very soft against your chest.
Or, if you already own foam leisure forms, you can trace a dotted line around the back of one for the stitching line, then draw a line around it about 1/4" further out for your cutting line, and that can be your 'back' pattern to cut out.
To make a 'front' pattern, just draw a dotted line 1/4 inch past the edge of the back pattern, and a solid line 1/4" past that for the cutting line. It's easy then to add some reference lines to match up and add a little tab area for a 'fill' hole.
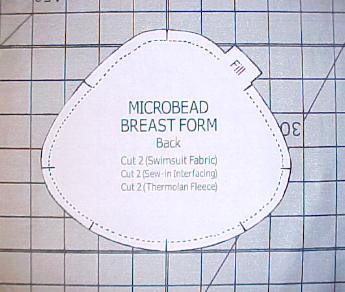
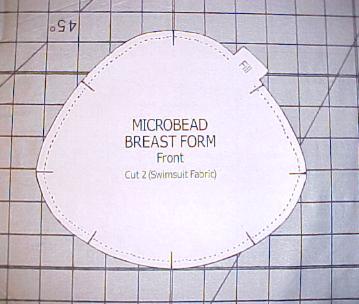
*Note: My pattern above (It's an XL) makes a set (2 complete breast forms) that fit inside size bras of size 44A, 42B, 40C, 38D, and 36DD. Draw this out exactly as shown in the pictures, then see below for changes you may need to adjust for your size smaller or larger. When I say to make it smaller or larger by 1/4" for example, that means to draw a line inside or outside the size shown in the photo by 1/4" or however much it says for your size. Each size you go up or down makes about 1/4" difference, so two sizes away from this basic XL pattern is 1/2" difference, three sizes makes 3/4" difference, four sizes makes 1" difference, and so on.
I apologize for not having found a way for you to accurately download an exact pattern for your size already drawn out.
Anyway, now you've drawn out the XL pattern. Pick your size below and draw out another pattern the required amount it says, in the direction smaller or larger as it says:
To make what I call an Extra-Extra Small (XXS) that fits 36AA, 34A, 32B, 30C, draw it 1 1/8th inch smaller all the way around and use 1 cup of microbeads.
To make what I call an Extra Small (XS) that fits 36A, 34B, 32C, or 30D, draw it 7/8 inch smaller all the way around and use 1 1/8 cup of microbeads.
To make what I call a Small (S) that fits 38A, 36B, 34C, or 32D, draw it 3/4 inch smaller all the way around and use 1 1/4 cups of microbeads.
To make a Medium (M) that fits size 40A, 38B, 36C, 34D, and 32DD, draw it 1/2 inch smaller and use 1 1/2 cups microbeads.
To make a Large (L) that fits 42A, 40B, 38C, 36D, and 34DD, draw it 1/4 inch smaller and use 1 7/8 cups microbeads.
To make an Extra-Large (XL) that fits 44A, 42B, 40C, 38D, and 36DD, draw it exactly to the pattern above and use 2 3/8 cups microbeads. (THIS IS THE BASIC PATTERN ABOVE THAT YOU START OUT DRAWING BEFORE YOU MAKE YOUR OWN SIZE PATTERN.)
To make an 2-Extra-Large (2XL) that fits 46A, 44B, 42C, 40D,
and 38DD, draw it 1/4" larger than the pattern above and use 2 7/8 cups microbeads.
To make an 3 Extra-Large (3XL) that fits 48A, 46B, 44C, 42D, 40DD,and 38DDD, draw it 1/2" larger than the pattern above and use 3 1/2 cups microbeads.
To make an 4 Extra-Large (4XL) that fits 50A, 48B, 46C, 44D, 42DD, 40DDD, and 38G, draw it 3/4" larger than the pattern above and use 4 1/4 cups microbeads.
To make an 5 Extra-Large (5XL) that fits 52A, 50B, 48C, 46D,
44DD, 42DDD, 40G, and 38GG, draw it 1" larger than the pattern above and use 4 1/4 cups microbeads.
(You can probably figure out from the above just how to keep going and make even larger sizes, or wait a bit and I will draft more sizes as soon as I have more larger bras to test with. To get each of these sizes, I had to collect a LOT of bras to work with and make adjustments to get each one to fit the most people's various styles, so it's taking awhile to get more samples. Still working on it though!)
You may need to make yours still smaller or larger to further customize for scar tissue differences and to fill out some style bras more or less fully. Sometimes before changing the pattern size, you may want to first try using 1/8 cup less or more microbeads than recommended when filling. Even a tablespoon's difference may be just right for you. The smallest sizes are harder to fit sometimes, particularly if you have an 'senior bustline' that you're trying to re-create, so it may take a couple of tries for you.
If you are making a pair of forms, first make and fill one, only lightly stitching it shut, then try it out in your bra cup to see if the size looks right. You can un-stitch the fill hole and add more or take some away to make your own custom adjustments, and make a note of it so that you fill the other form with the correctly matching amount.

At this point, it's handy to also mark 'OUT' (for outside) on the dull side of the fill hole tab and 'IN' on the shiny side, of all four pieces of fabric. This will make it easier to understand the directions below.

You'll then layer some sew-in interfacing and cut two 'back' pieces of that.

Next, layer a couple pieces of the Thermo-Lam fleece and cut out two more 'back' pieces.

If you're not familiar with this sort of fleece, it's normally found in the interfacing section of your fabric store. My bundle looks like this, but you may find another kind that works as well. It's just stiff enough to help your form hold it's shape, but soft enough to be comfortable.

You're first going to join the three layers of each 'back'.
First, lay down the 'back' pattern piece with the 'IN' (shiny) side facing up. Lay one of the sew-in interfacing pieces on top of it, matching and pinning at least four times around the edges.
Stitch a straight stitch all the way around it, very close to the edge, including the edges of the fill tab.

Lay the fleece piece on top of the interfacing, pin it at least four times around the edges so it won't shift, and stitch again around, very close to the edges, and also sewing around the edges of the fill tab. This will keep you from accidentally putting the filling between the wrong layers later. :^)
This makes a sandwich of the three back pieces, and you'll now treat it as one piece. You may wonder why not sew all three pieces together at first, but it's just easier to do it this way so that parts do not slide around and you're sure you're only catching the edges.

The 'back' pieces will now be flesh color on one side and white fleece on the other side, like these two below with one flipped over.

You'll now go to work on the 'Front' piece of swimsuit fabric. We
need to make two rows of basting stitches around the edge so that
it can be pulled up and 'eased' onto the smaller 'Back' piece without
leaving gathering marks. (For those of you who sew clothing, it's the same way you'd baste and ease a larger sleeve cap into a smaller bodice armhole.)
Jot down your upper sewing machine tension number so you can quickly reset it later, then set tension to '0', stitch width to '0', stitch length to the longest (about a 6 stitches per inch on my machine, but it may different on yours).
With the 'OUT' (dull) side of the fabric facing up, stitch the first row
1/8 from the edge, raising the presser foot often to release the
fabric tension, and trying to turn the fabric in a circular motion as you sew.
You'll start just inside the 'fill' tab on one side and end inside it as well, but you'll not be stitching up into the 'fill' tab area this time. Leave long thread tails at the beginning and the end of this row.

Stitch another row around it, 3/8" from the edge, leaving long thread tails again.

This is how it should look when you're done with these two basting lines.

Flip the fabric over to the 'IN' (shiny) side, grasp the basting threads (it's the bobbin threads) on that side and pull gently to make gathers around the edge of the fabric.

Place the 'OUT' (dull) sides of both the back and front pieces together,
pinning at the reference lines. (The marks don't show up in my photos, they were already fading by this time. It's not critical that the reference points match, just use them as something to aim for.)
Using your fingers, ease out the gathering rows until the larger front piece matches the size of the smaller back piece, and pin again, half way between each previously pinned reference mark. If you need to, you can re-pin and ease it some more to get it to fit, and it'll still work. As mentioned before, the marked reference points are not written in stone. :^) It'll look something like the photo below, but use as many pins as you need. I've sometimes put in about 30 pins on a small form and as many as 50 on a larger one.

Here's how it looks on the back.

On your sewing machine, reset your upper thread tension back to the
number you jotted down before. Stitch width will be '0', stitch length to
about 12 stitches per inch.
Remembering to leave the 'Fill' hole open, start near it's lower edge, stitch around the front (with the gathers facing up toward you), sewing about 1/4" from the edge, easing the gathered fabric a bit more as you go, smoothing it and pulling the edges to match it even more to the 'Back' sandwich of fabrics below it.
TIP: Be sure to backstitch a couple stitches at the beginning and end of the seam, just to lock the stitches so the layers won't stretch apart at the end of the stitching lines as you're turning right-side out or when you're filling with microbeads. As you see in the photo below, you're stitching between the rows of gathered basting stitches.

You may notice in the above photo that I'm using a sewing gadget called
a 'Sixth Finger Stiletto' so that I don't have to get my own fingers too close to the needle, I love that thing, HIGHLY recommend that everyone who sews needs one....but you can use anything pointed, like a wooden chopstick or an awl, or even a small flat bladed screwdriver, to help guide the fabric just as it goes under the presser foot.
Pull out the basting threads, starting with the top ones that are hanging out where you just stitched because they are the gathering threads and will pull out easily... then reach inside and pull the other two out.. Trim evenly around the edge now, making sure to stay at least 1/8" away from the seam you just made.

You'll now go around it again with a zig-zag stitch. Set your machine's stitch width to medium-wide, which is 3 on my sewing machine, and keep your stitch length short at around 9 to 12 stitches per inch. Go all the way around it except for the 'Fill' hole.
Try to let the right side of the zig-zag stitch fall just off the edge of the
fabric, to further help seal in the microbeads you'll soon be adding.
This seam is redundant maybe, but so far, I've never had a microbead leak after YEARS of using mine. Redundant is good. Repeat that to yourself. :^)

Turn the item inside out through the 'Fill' hole. You'll think it's hard to do at first, because the hole is so small, but the front fabric is very stretchy and you'll be able to work it through fairly quickly.
You could actually have stitched around the whole thing with a satin stitch and filled it with microbeads without turning it right side out, but I think it looks much better with the seam on the inside. (Commercially made expensive microbead breast forms usually have the seam on the outside, but that's because it's faster to do that in a factory. You're making this for YOU, so you may as well make it look nice, and then you won't have a seam showing through your bra cup, either. Below, you'll see it turned right side out, ready to be filled. Looks flat, doesn't it? Don't worry, the microbeads will stretch it out into a good shape.

Now for the filling! Microbeads are quite hard to work with unless you know a few tricks.
One trick is to reduce the static electricity by using an anti-static spray to spray down your hands and tools, you can find it in the laundry section of your local Walmart... OR you can reduce static by rubbing a hypoallergenic dryer sheet all over your funnel, hands, measuring cups, etc... I did use some spray (while making these photos) that I found near the spray starch at the store. However, it can have a temporary scent that bothers my allergies while spraying, so now I only use non-scented dryer sheets. You'll have to rub them all over everything before filling each form though, as dryer sheets don't keep the static electricity away as long as the spray.
This will help to stop them from clinging all over everything they touch. If you don't use something anti-static, you will be COVERED in the little microbeads, all the way up your arms. They're very hard to wipe off, and they go EVERYWHERE. Be sure to keep a vacuum cleaner near you and already plugged in while you're working, because once these things get ground into your carpet, they're not coming out easily. Better to catch them while they're all in one place, still on top of the carpet fibers. Vacuum yourself, too, while you're at it. :^) Trust me.
Below is a photo of the size funnel I use and a can of the anti-static spray.

To help control the pouring of the microbeads, I sawed off the bottom of a pill bottle and attached (by rubber bands) the remaining capped tube to a stretchy fabric bag full of the microbeads. You can attach it to a plastic bag full of them, but I like to put a smaller amount into my fabric bag 'dispenser' so it can be used inside the 'blanket bag' during the fill-up.
As you can see in the photo below, it makes a pretty easy way to give your bag a 'spout' that you can cap off. This is very 'low tech', but it works. :^)

Put your breast form, a measuring cup, and a funnel inside the blanket bag along with your dispenser bag of microbeads.
Trust me on this, you will need to work inside a plastic bag of some sort, or else these beads will roll all over the place with every bit of air, going all over your surroundings. By using this method, there's seldom a single bead that escapes. Just unzip a small section of the blanket bag to get your hands into it, fill the fabric breast form with microbeads, tuck the 'fill' hole tubes back down inside the breast form even with the rest of the seam line, and pin shut. (You can cut off some of the length from the tube if you want. I make mine with practically no length to the fill hole now, but I've made a lot of these...and don't recommend having a very short fill hole if you're a beginner because the microbeads can escape easily while you're working.)

Looks like a little frownie, doesn't it? Microbeads don't like being captured. :^) Carefully remove the form and your hands from your blanket-bag enclosure, being sure to brush away any stray microbeads first so they'll fall inside the bag, and zip the bag shut to contain the mess until next time.
Using a very fine hand-sewing needle, stitch the 'fill' hole closed, being sure to take very small stitches and going back over it several times to prevent any leakage in the future. There are so many ways to stitch it closed, that I'll leave that part to you. I wear jewelers magnifiers over extremely strong sewing eyeglasses, because I like perfect little barely noticable seams, and I sew two seams. This is not necessary, it's just obsessive, lol... I'm funny that way. Bet you couldn't tell, lol... yeah, right, lol....
No one else will ever see your forms inside your bra, so it's perfectly fine to just sew them shut any way you want that will be strong enough to last.
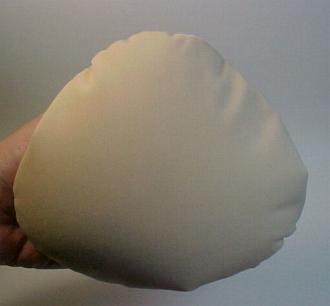
When you first look at your newly completed form, you may think there's a mistake, it's too flat and a little loose looking. However, you do not wear them flat. When compressed at the sides as worn inside a bra cup, the front protrudes, stretching out the thin layer of swimsuit fabric to fill the bra cup. Here below is the microbead form on the left, a purchased foam leisure form on the right.

You can see in the photo below how it smooths out and starts to protrude when I barely press on one side, so you can imagine how close in shape it really is to the foam leisure form you see on the right side. The back also seems to shrink a little at the seam as the beads move, so that this XL microbead form ends up about the same size as the 'size 9' purchased weighted foam form on the right, and actually fills most bra cups better. It just WEIGHS a whole lot less than even the foam form.

On other pages of this website, you've seen the special mastectomy version of a duct tape mannequin that's my true 'body double', without breasts. (Look for it on this website's Copy Yourself page to see how to make one.) I've put a mastectomy bra on the breast-free mannequin here with the microbead breast form in the side to the left of the photo and the purchased foam breast form in the right side of the photo. As you can see, there's no difference visible through the bra (other than maybe it fills the cup better than the foam one), so obviously there would be no difference when seen through clothing when you're wearing a set.
The BIG difference is that each microbead breast form weighs only about an ounce, instead of 8 ounces of a foam one, or average 16 ounces of a silicone breast form. That may not sound like a huge difference to someone who doesn't wear mastectomy forms all day, but there's a very large difference in one ounce of weight over a painful scar and one pound of weight pushing into that scar.

To further improve the almost pain-free aspect, make a slip into a mastectomy camisole by shortening it and adding bra-pockets, and wear microbead forms inside that occasionally instead of a regular bra. That will take away the pressure of a bra band and give you a feeling of wearing almost nothing at all. It may be a less 'defined' bustline when you wear a slip/camisole instead of a bra, but the comfort level is much greater.
Once you wear lighter weight microbead forms in a looser slip/camisole for a few days, you'll dread the days when you wear a bra and/or silicone forms. It's like the difference in comfort between wearing high heels to work all day and coming home to put on your soft houseshoes, ahhhhhhhh.... If you aren't comfortable wearing these away from home for some reason, just save them for when you get home, and give your body a rest.
***Note: Since writing this, I've started wearing 'Genie Bras', those 'as seen on TV' bras that you can now buy at places like Walmart and Bed, Bath, and Beyond stores for around two for $19 or so. The latest ones have two layers of knit in the shaped bust areas, and there's an access hole inside the side/underarm area where a bra shaper cup is. They put that there so you can take the little 'shaper' out for laundering, but the hole is also big enough to get microbead breast forms in behind the shaper.
It takes a few minutes to work them in, but they will go. These bras have worked well for me as mastectomy 'comfort bras', though I do recommend buying one or two sizes larger than you think you need by the sizes on the back of the box. These are made strong to compress breast tissue and hold up heavy breasts, but you don't need or want compression, you want comfort, so get the larger size. In my case, they still eventually ride up, so I stitch on a tube of fabric as well, such as is described on the 'Bra Band Ouch Fix' tab on this website, but most of you won't need that.
These microbead forms may not totally take the place of foam or silicone breast forms for you. I still sometimes do wear my silicone ones, just not very often, maybe for very special occasions. The weight of those still not only cause pain after a whole day of wear, but I've found that one arm frequently swells with lymphodema afterward, particularly from the extra weight of the silicone forms. It sometimes takes several days to reduce the swelling and pain, so it's just easier to wear microbead forms as often as possible for me.
***As a little tip for comfort, try loosening the hooks on your mastectomy bra by one row when wearing microbead forms in it if you have the room. A tight band is only needed to hold heavy forms in place. These are so lightweight that there's no need for tight constriction. And remember, the wider the bra band, the less tight you'll have to hook it for microbead forms.
If your bra band is too tight even at the last hook section, use a bra band extender (available at fabric stores and some discount stores in the sewing section) to see how a larger size bra band will feel on you.
To wash your microbead forms, use the same technique you'd use for most very delicate undergarments, wash only in your bathroom sink in cool water. They float, by the way. Put a little of something you'd feel safe with, anything from baby wash to Wool-wash (oh alright, you
know the brand I mean!) in the water and swish your forms around a bit. (I prefer a few drops of original green Palmolive dish-washing liquid, cleans well and is good to your hands, and costs very little.)
They can soak a few minutes if you like, it won't hurt them, but it's not usually needed. The microbeads do not hold odors nor do they absorb anything, you're mostly only washing the outside fabric. Swish the forms around in soapy water, then put fresh water in the sink and rinse.
Gently squeeze the forms in a terry towel to dry them some, then lay on a rack to completely dry. (Read more about caring for forms and mastectomy clothing by clicking below.)
I hope you enjoy wearing your new microbead forms as much as I do mine. If you have problems making yours, just email me and I'll try to help you figure it out. :^)
***NOTE: If you wear your new microbead forms awhile and then decide they're a bit too full for you, you can remove some 'stuffing' (microbeads) by going here to see my easy tutorial on removing them:
WASHING FORMS AND FABRICS (Go here to learn more about washing and drying your delicate items.)
*************************