
COPY YOURSELF! Make your own sewing mannequin or 'duct tape double'.
I so firmly believe that this can be helpful to other survivors of
breast cancer, that I'm willing to let everyone see how fat I am...
(Chemo can make you chubby, deal with it people, I have.) Even if you
don't sew a lot and just need to alter your clothes to fit the new you,
one of these mannequins can help you SEE exactly what areas you can
adapt, and what others see of you from all angles. Everything from
draping a scarf to adding a little lace to your necklines can be made
loads easier when standing in front of your exact double. Cost is
minimal, probably $30 or less, depending on how many supplies you
already have around the house.
************************************************************************************

Working with all these issues and more, I found that the PERFECT solution for me was to build a 'duct tape double'. If you've not heard of them, you can Google the term and find lots of different directions on how to build your own, but I'll give the 'bare' directions further below so that you can make it work for you. By making your dressmaker form as an exact copy of your 'real' body, without a bustline, you can make any garment to exactly fit you, according to which breast forms and bra you will be wearing for a specific purpose.
For example, if you're making a swimsuit, you'll be wearing swim forms that are a little different than your usual forms, AND you'll need a map of your scars and chest depressions so you'll know where to adjust the neckline and armholes without showing off areas you don't care to. If you're making a pajama top, you'll want to know where to put a few gathers or ruffles to disguise a 'sunken in' spot because you'll not be wearing forms. If you're making a 'dressy dress' for special occasions, you'll probably be wearing a full coverage bra with silicone forms and need to know where the darts should be adjusted.
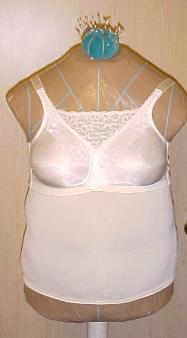
With a dresssmaker's dummy that's really shaped like your own body, it can be changed for specific needs by simply putting on it the undergarment and breast forms you'll be wearing with the garment you're fitting. Leaving an old bra and an old set of foam leisure forms on the mannequin all the time is fine for most things, and it can even be pinned into. However, it's so easy to unsnap the bra and put a mastectomy camisole on it, or put on a different style bra, or different forms... only takes a minute or two.
- Most important, get a helper...husband, sister, friend. If you have a sewing friend in your breast cancer support group, you might convince her to help you make yours if you help her make hers. My patient loving husband taped me up...and I forgave him for threatening to not cut me out of it...really, I did. :^)
- Several rolls of duct tape. I used three of the ones from Walmart, found near the paint section. Duct tape comes in many different colors now, so I chose a flesh color. Go wild if you want, they even have neon colors and some with wild animal prints!
- Cheap scissors to cut the tape. You can tear it, but that gets old fast. It can gum up scissors, so use the dollar-store kind.
- Find a turtleneck t-shirt-knit top, short or long sleeves, in a smaller size than you normally get. It needs to fit very snugly against your body with no wrinkles. (Find one at a thrift shop if you like, it's going to be cut apart later and won't show at all on your finished mannequin, so the color doesn't matter.
- Several bags of polyester craft stuffing, or old scraps of quilt batting, or anything similar to stuff your mannequin, some people even use old pantyhose but that may make it heavy. It depends on your size and how firmly you stuff it. I used a lot of leftover polyester stuffing for mine, so I can't tell you exactly how many bags. Several. OK, lots. Don't judge. Look at yard sales and thrift stores to save money on poly-fill.
- You'll need a stand for your 'double', a heavy floor-lamp base and pole work well, as does a heavy cast iron Christmas tree stand with a piece of pipe, or an old hospital IV pole that rolls.
- A thick PVC plumbing pipe from a home center is needed for the center of your dummy, cut long enough that you can adjust it later for height. You can cut this with a hand saw after you're done. It needs to be large enough around to fit over the pole of a floor-lamp or whatever you're using as a base.
- A heavy wooden shoulder shaped coat hanger, the nice type used to hold men's coats. This will be used in the shoulder area of your dressmaker double to support the mannequin's shoulder area a bit.
- A long 4" wide strip of thick vinyl, or something resembling a piece of old thick flannel backed plastic tablecloth, to lay along your backbone under the t-shirt, so you have something safe to cut against without snipping your skin!
I'll give a basic direction here, but if you're unsure about any of it, just Google the subject 'duct tape dummy' and you'll find more very specific directions.
First, the person to be 'copied' should only wear tights or pantyhose on their legs, no jeans or slacks, and a very long turtleneck t-shirt top, no bra or breast forms, of course. You want the 'double' to be a true double.
Put a long, narrow (about 4" wide) strip of thick vinyl (even a strip of plastic tablecloth will do) inside the t-shirt, with it extending out the top at the back of the neck, covering your spine all the way down to below the back hem of the t-shirt, and extending visibly outside the bottom. This will give a place to safely cut the t-shirt off after you're finished, without nicking skin or anything.
From now through the next hour or two, it's simple. The person to be copied must stand, but can move arms at this point, so they can cut lots of lengths of duct tape to hand to the helper. It's easiest to do if the lengths are maybe a foot long or less, otherwise it tends to stick to itself and you'll throw away a lot. The helper takes the pieces of duct tape and randomly sticks them onto the t-shirt, slowly covering all the torso, criss-crossing and pressing down the tape.
This will go on for several layers of tape and the person being copied will need to stand level and keep fairly good posture during this, but not exaggeratedly good posture because you want the mannequin to have the same shoulder slope as the person usually has. If the person has bit of a slouch, so be it, because that's how customized garments will need to be fitted later on.
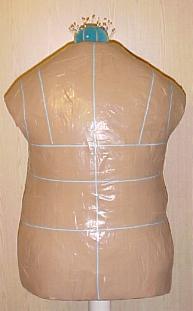
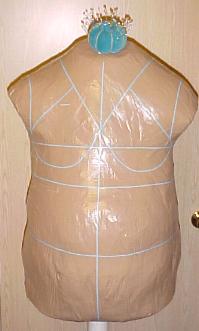
Keep going until at least 3 or more complete layers are done. More is always better. Don't bother with putting very much onto the upper neck or sleeve area, as these will be trimmed away later anyway. Look at my photos to see how far to go over.
When finished, the helper slips the scissors between the length of vinyl laid along the person's spine, and cutting over the top of the duct tape, cutting totally through the fabric of the t-shirt covered in duct tape. Cut straight up from the hem at the back to the back of the turtle-neck, along the spine area. The person inside can slip backwards out of the form, just like coming out of a shirt that's been put on backwards.
Tape a heavy coat hanger to your length of PVC pipe up at the top, using LOTS of tape to secure it really well, so it can support the 'double'. Hang the duct tape double onto the hanger and start stuffing until it's hanging fairly well on it's own.
When it's starting to look 'body shaped', tape across the cut here and there. You're going to measure the person it came from at the bustline, waistline, hips, and stuff the copy until it's as close to the same in the same areas as possible, then tape more securely across the cut. Try not to overstuff, because it'll push out the sunken in areas of the chest wall.
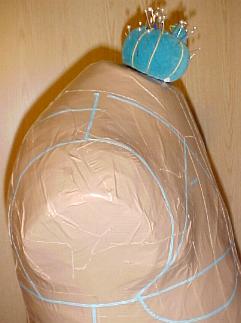
Now comes the fun. Snip around the armholes and place a circle of cardboard there, cut to closely resemble the shape of the armhole opening. (I left mine with a bit of upper arm at the shoulder and made my cardboard angle inward toward the armpit, it's easier to fit it right that way.) Tape in place. Do the same for the neckline, with an oval of shaped cardboard to fill the hole. This makes a handy spot to attach a pincushion for fittings later.
Trim around the bottom at around low hip level or so. Use a large piece of cardboard with a hole cut in the center to fit over the PVC pipe, push it up, sketch around the base of the 'double' to get a good fit for the cardboard oval, and take the cardboard off the pipe to cut it out. This will make a really closely sized filler cardboard. Put it back on and tape it securely around the bottom edge of the 'double'.
Cut the bottom of the PVC pipe to the right length to fit over a floor lamp pole or whatever it's going to sit on, trying to make it so that the shoulders of the double is about the same distance from the floor as the person it's copying, when she is wearing shoes with the most common heel height. This may take a little trial and error, so cut the pipe too long at first and then measure how much more needs to be removed as you fit it over the floor stand and measure the height. You can make the pipe shorter with more cuts, but not longer, so take your time here. You'll notice in the photos above that I've now sat my pipe over a rolling 'IV pole' such as you'd see at a hospital, makes it so easy to move.
Now, as you're standing there facing your double, make sure it's about the same shape as you all over and tape completely another layer again, more layers if you want, to cover all the mends well and keep it in shape. (I overstuffed mine a bit accidentally,but left it that way because it gives me a little extra comfortable 'ease' when fitting.) You can consider yourself done at this point, or you can do the steps below.
While the person being copied is next to it, use elastic to figure out exactly where their waist is by tying a loop of elastic snugly at the waist and moving around until it settles on the waistline. Match this same area on the mannequin and tie a string around it to mark the area, then draw a waistline with a permanent pen along the string, or you can also tape or glue on narrow ribbon there to mark the waist. I used some narrow blue tape found at the graphic arts department at Hobby Lobby.
It also helps to mark where the largest area of the hips are, mark the top of the shoulders where sleeve seams generally are, between the neck and sleeve top. Mark where the top of the arm is at for armhole seams, and even mark all around the armhole if you like. Mark a line up and down the center back and center front,
I also put tape to mark along a "V" shaped neckline that I don't like to cross. It's just high enough so that it totally covers the hollow upper chest area (where tissue is missing even above bras). Mark any trouble spots you may have that you don't like to show, such as the scar left from port removal after chemo, and the drain tube scars on the torso sides. If you mark these trouble spots, you can put any garment on your mannequin, or even hang a paper pattern on it for a test fit, and see right away where you may need to add some fabric to cover them.
Now here's just a little warning....you will SWEAR at first that you look nothing at all like your 'double'. We see ourselves daily in mirrors, but it's a flat view. When you see yourself from behind or from the side, seeing how much of a 'hump' you may have in your back from working at the computer, seeing the tummy sticking out that may not have even been there prior to chemotherapy, it's a real eye-opener. Without breasts, the tummy looks even larger, maybe even pregnant. Takes a bit to get over the shock the first time, it did for me anyway. You'll notice I didn't post a side view in the photos above, lol... I love you people but must draw the line somewhere on what I'll post for the world to see!
The good part of it is that once you put a bra stuffed with breast forms on your new 'duct tape double', you start to see it more as a 'whole' and it looks more balanced. It's somewhere around this time that you get the 'AHA' moment where you realize that it all was worth it, because it's going to make it SO much easier for you to fit your clothing patterns, and also see where to adjust your ready-to-wear garments.
Give your twin a name if you like, as she almost is real. Call her 'sister' if you want. She won't mind. I leave mine with a garment on it, even if it's just a vest. After all, she has a LITTLE modesty left, lol... and I don't like seeing myself in 3-D ALL the time. If you like, you can put a thin layer of quilt batting over the 'double' and leave it dressed in a very snug t-shirt, or sew a snug fitting cover for it, as this will make it easier to pin into. I've never gotten around to doing that on mine. After all, pins will stick somewhat into the duct tape.
That's it, the whole secret to making your fitting easier. Takes awhile to make, but saves you hours of fitting anything in the future, so I was never sorry to have made mine. Neither was my husband. He no longer had to hear, "Does this make my behind look big?" Afterward, I could answer myself, "Yes, as a matter of fact it DOES." :^)