How to Custom Fit Your Completed Microbead Forms
Did you finish your first pair of microbead forms, or order a pair from me in the size that matched your bra size, only to find they are too 'perky' for your preferences? Sometimes age is a factor, sometimes there's more tissue remaining on your chest than is usual for a mastectomy, more scar tissue, maybe one side was done at a different time by a different surgeon who left more skin. Whatever the reason you'd like your new microbead forms to be a bit smaller in volume, you can fix it in just minutes.
If you can hold a needle and thread well enough to sew on a button, you can customize your forms. I've given lots of really simplified directions and photos so that even someone who thinks they can't sew, really can do this. Let's get started:
First, we'll need a few common household items... a mixing bowl, dryer sheet, needle, thread, scissors.
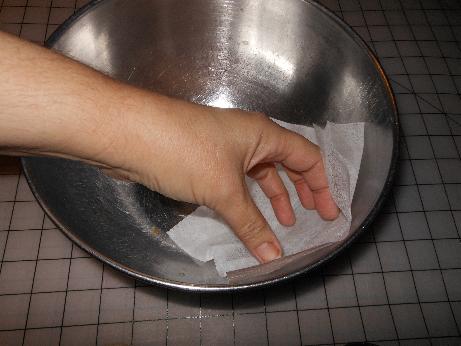
Wipe the bowl well with a dryer sheet to help reduce static so the tiny microbeads won't stick as much. Wipe down your hands, too, and the outside of your microbead form. They'll still fly around a little bit, but this will contain most of those pesky beads.
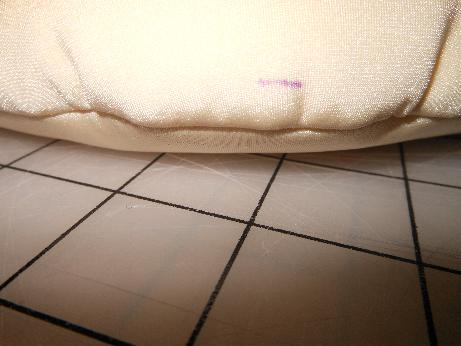
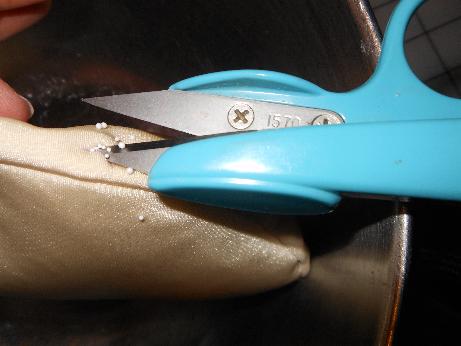
Look at your microbead form from the bottom edge. Here below you see the form with the flat back side downward, and protruding front side pointing up. You'll want to choose a small spot to snip that's on the front of your form, but way down near the bottom seam, usually somewhere between 1/4" to 1/2" away from the seam. (You shouldn't cut the back side, because there's a thick layer of thermolam inside it to be extra soft on sensitive chests...on the front, the microbeads will me much easier to remove because they're right next to the fabric.)
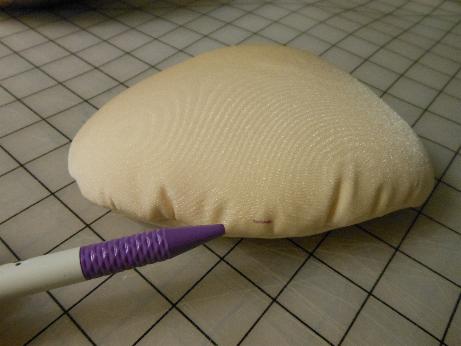
If you want to, you can make a small mark to guide you. I used a 'dissappearing ink' type fabric pen in photos further down, but you can use a pencil, pen, anything you like.

Look closely in the two photos below, you can see the tiny purplemark running beside the seamline, maybe 1/4 inch long. You can make it bigger to remove beads faster, but with a smaller slit, the beads are HARD to squeeze out, which means you're not as likely to remove too many.
Now, we're going to pick up the form and snip across that little line. I'm using tiny thread clippers here, you can use whatever kind of scissors you have.
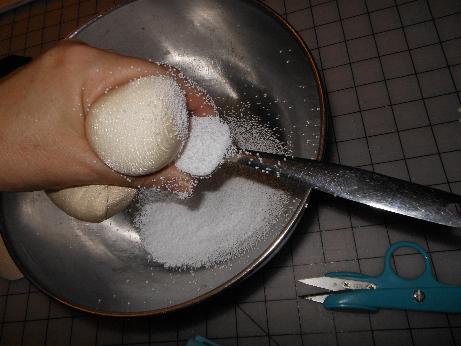
Now you're ready to remove the microbeads. The smaller your form size, the more careful you should be, to not remove too much. With very small forms, even a tablespoon will make a difference in size. With a larger form, you may want to remove 1/8th cup at a time. You may have to really squeeze the form hard and sort of push the microbeads out. As you can see in the photo below,they're not especially happy about coming out on their own, you have to help them along. Firmly. Try doing this one-handed with a camera in the other hand. Go ahead, I dare you. No? OK, just squeeze and measure, then, however you like.

As you can see in the photo below, the beads will start to stick to things...you...the bowl...the spoon...and the outside of the form. Ignore it. Just keep squeezing out and measuring until you think you've removed the minimum you want to try. Remember, don't remove too much. You can always put them back in with a small tipped funnel, pushing them down with the eraser end of a pencil, but it's way better to just remove a tablespoon at a time so you don't have to.
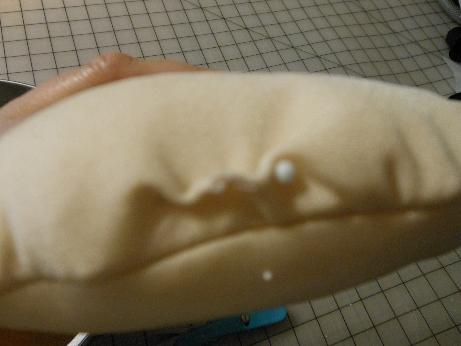
Below, you'll see the tiny opening after you've removed the beads. See how it shrinks down closed again when you stop pushing the beads out?

Now is when you need to hold the two edges closed with a pin, use a safety pin if you're worried about sticking yourself, or a straight pin like I did here in the photo below. Since you're pinning the side that fits AWAY from you in your bra, it's not as likely to stick you, but be careful. If your form now fits in your bra much better on the side with the adjusted form, great, you're ready to close it up! If it's still a bit big, remove another tablespoon full and try again. I'll wait for you.
OH! Youre back already? Fits better? Alright, let's finish. Get a needle threaded. If you don't have beige thread, use white, grey, light pink, whatever you have handy. It'll barely show anyway, and who's going to see it? It'll be inside your bra, right?
What are you looking at my work area for? Pay no attention to the tiny beads I spilled in the photo below. Move on, nothing to see here... Even I spill beads, so I keep a little vacuum cleanerhandy at all times in my sewing room.
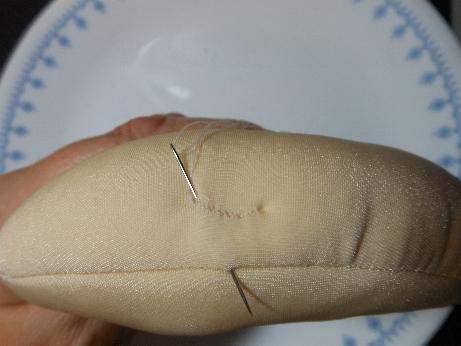
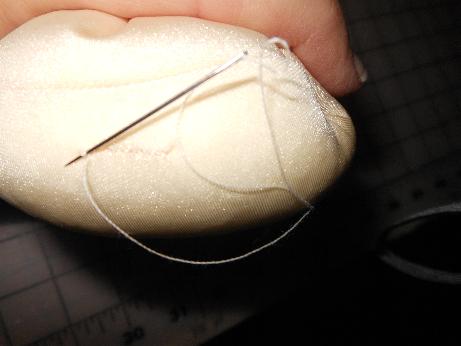
Thread your needle with 16 inches or so of thread. The length isn't critical, but you're going to be doing this again with the other microbead form so may as well have enough thread left on the needle for it as well. You're just going to remove the pin, pinch the fabric together a little, and stitch across the hole, taking a little tiny bit of fabric in on each side of the hole. If you pull gently, it'll tighten up the 'scar' so that it's barely noticable. See below what a tiny bit I've taken on the needle? The smaller the 'bites' it takes, the tinier the scar will look. If you don't want to bother, just take big old 'X' shaped stitches and it'll work fine. Also, if you want to be extra safe, you can sew across it again. Up to you.
When you reach the end, poke your needle inside the microbead form near your stitching and come back out at the seam. Take a few extra stitches there on the seam just for safety, but don't pull the thread too tightly before the first stitch, you don't want to pull the 'scar' down toward the seam. Stitching several stitches on the seam line is easier than making a knot in the thread. After that, I usually poke the needle in again and come out back near the scar, then clip the thread there. The end will sink back below the surface, so everything looks nice and neat. Wasn't that easy-peasy!
Now all you have to do is measure how many tablespoons full of beads you took out, and take the same amount out of the other form if you want them exactly alike. If you need the other form to be different, just start over with taking some out, trying on the form, etc... same as for this one.
Well, there you have it, how to remove some microbeads from your forms to entirely customize them for your exact needs. :^)
If you're wondering why there's a plate behind the form below, it was to catch any falling beads when I sat down to stitch these under a nearby lamp. A good lamp and some reading glasses makes the hand stitching go ever so much easier for older eyes. :^) Stop laughing, really, your time will come, lol...